Showing posts with label Photoshop Basics. Show all posts

Sunday, May 11, 2014

How to Combine a Paper With a Mask

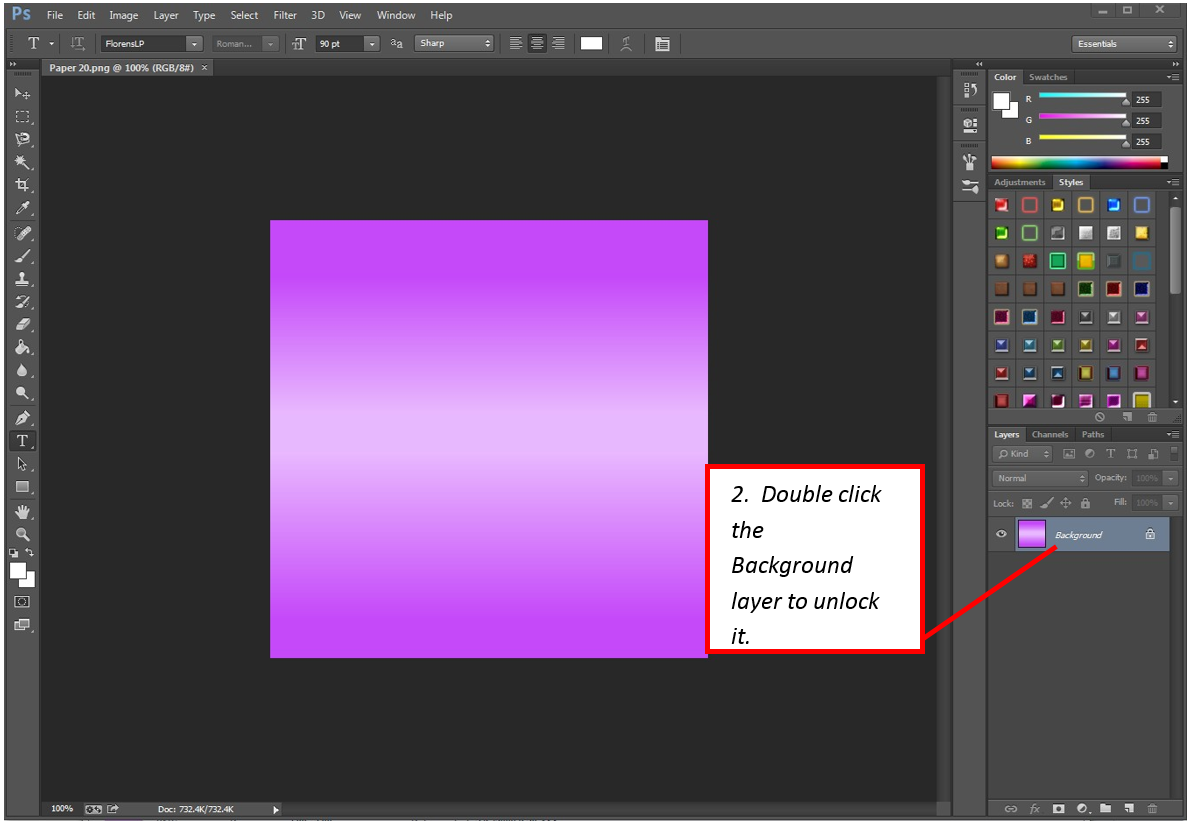
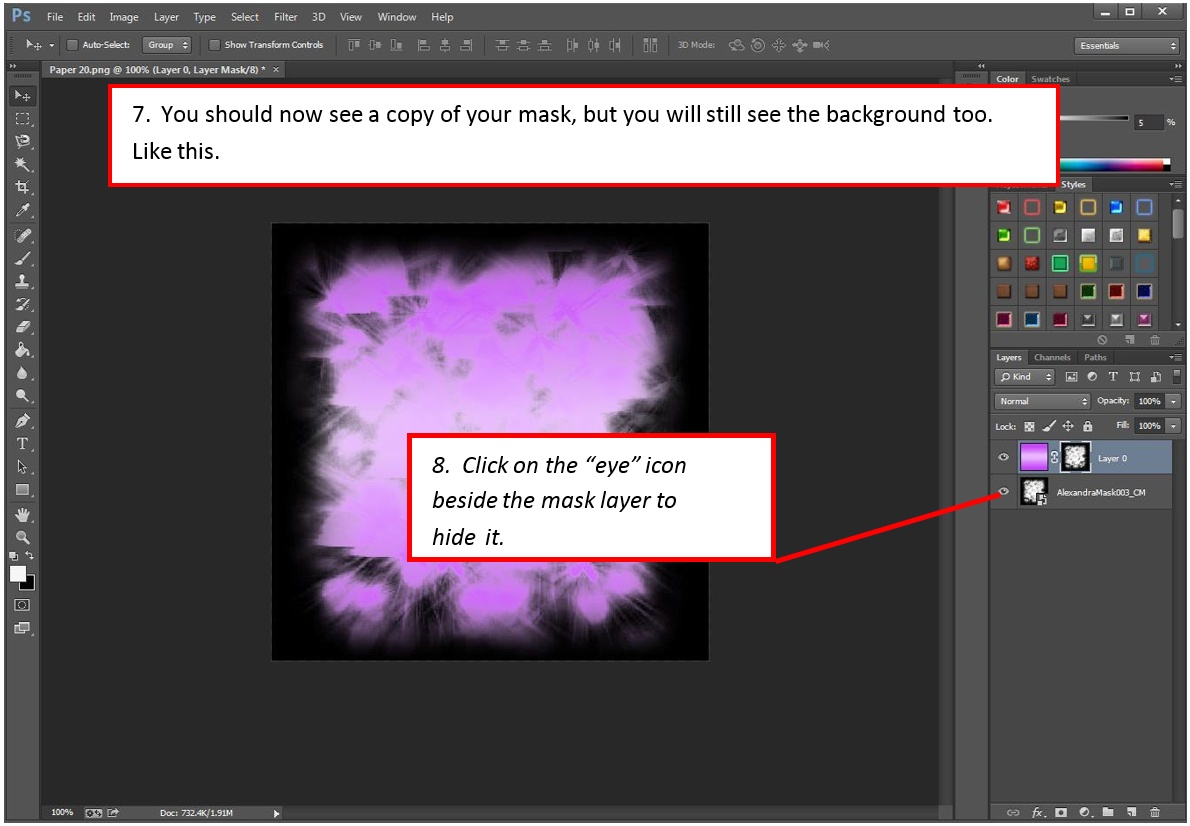
I wrote this up as a step by step on how to create a background by combining a mask with a paper.  The process is actually very simple but I had a horrid time trying to figure out how to actually do it.  It was a very nice tutorial by Chrissandra Watson (Tags by Groovy Gemini) that finally taught me how.

In referring other people to her tutorial, I found that some needed a bit more pictorial explanation so I wrote this up.  Hope it helps anyone who is more of a visual learner.

Supplies:
Paper of choice
Mask of choice

Open your paper of choice and follow along.


Wednesday, February 26, 2014

Photoshop Tag Tips and Tricks

Instead of continuing to repeat these instructions in my tutorials I decided to create a tutorial type document which I can add to over time to include helpful information you may need while following my tag tutorials.  Hope you find it helpful!

Helpful tips and tricks:

Resizing tubes and elements – To keep from distorting your images when you resize them use either option below:
1)                  Hold down Alt + Shift on your keyboard and use your mouse to select one corner and drag
2)                  Increase the scale size up in the action bar by the same percentage (100% is the beginning size).  After you have resized it, click the a on the action bar to commit the change to the image.

Rotating elements – Use “Free Transform” (Ctrl + T) and then use the mouse to select a corner of the image and rotate it in the direction you want.


Mirror images – Use “Flip Horizontal” or “Flip Vertical” to create a reverse of your image.  From the menu select Edit > Transform > and then whichever flip you want.

Blending options – Right click on a layer and select Blending Options.  You can use the General Blend Mode to get different effects light overlays, lighting effects, etc.  Play with the modes and see what you like. I tend to use Multiply and Overlay the most, but have used most of the modes at one time or another to get an effect I want.

  • Stroke - I use this option all the time on text.  It creates an outline of the layer and you can change the color and thickness.  This really helps make words stand out against a background.
  • Drop Shadow - This is a great way to add a more "realistic" effect on your image.  It adds a shadow behind the image at an angle which creates the illusion that the image is raised off the paper.  You should play around with the angles and see what works for each situation.  Changing the shadow angle can make a big difference on how "raised" the image looks and can make it appear to have a different perspective.
  • Outer and Inner Glow - This is another very handy tool to help give some "life" to your work.  It does exactly what it sounds like.  It adds a glow to the inside or the outside of your text or image.  I suggest playing around with it to understand how it works, but if you want to know more before playing, check out this tutorial:  http://www.flyingmeat.com/acorn/docs/outer%20and%20inner%20glow.html
I hope this tips and tricks will be useful!  Enjoy playing with them.  As I find more that I rely on a lot I will add to this document so be sure to check back!

How to make a clipping mask

For me the easiest way to demonstrate this is to use a template. Here is a link from which you can download Template 480 by the amazing Millies of Millie’s PSP Madness.

We are also going to be using papers  so if you need a pack you can download the FTU pack I used called Perspective here:


Abbreviations:

SS Screen Shot

1.       Open your Template and delete layer Raster 1”.


2.       Open up your first paper and expand it so that it covers the entire pink background circle (see next SS).


 3.       Drag the Paper_1 layer down so it is between layer 1 and 2.


5.    The paper disappears except for where it covered the layer directly under it.

6.       That is all there is to clipping a mask.  Cover the shape with something else, right click, and  select “create clipping mask”. When I work with templates I often use the same paper for all the elements of the same color to keep the continuity of the template that the artist created, but it is entirely up to you on what to cover each layer with.  To practice keep adding papers and clip to each layer.

7.       I’m also going to throw in some information on how to make the layers stand out . Here is mine after adding all the papers.


8.       As you can see the layers all kind of run together. You can use blending elements like Drop Shadow and Outer Glow to separate them, but it is important to understand that you have to add the blending to the layer of the base object not the clipping layer or it doesnt show.

9.       Right click on layer 7 and select Blending Options and then select Outer Glow and Ok.  Now you will see your words stand out.


10.   Continue playing around with Blending options on the base layers until you like the results. Here is what I did:

  1. Layer 1 Stroke and Inner Shadow
  2. Layer 2 Bevel & Emboss and Stroke
  3. Layer 3 Outer Glow and Drop Shadow
  4. Layer 4 Bevel & Emboss, Outer Glow, and Drop Shadow
  5. Layer 5 Bevel & Emboss and Stroke
  6. Layer 6 Nothing
  7. Layer 7 As in step 9
  8. Layer 8 Outer Glow and Drop Shadow
  9. Layer 9 Bevel & Emboss, Inner Glow, Outer Glow, and Drop Shadow
  10. Layer 10 & 11 Inner Glow and Outer Glow

And now for my finished product……